
使用 OpenTelemetry Collector 监控 SNMP 网络设备
使用 OpenTelemetry (OTel) Collector 从支持 SNMP 的网络设备(如防火墙、路由器和交换机)中收集指标,并将其发送至 SigNoz。
Collector 的 SNMP 接收器 以固定间隔轮询每个设备。它读取你列出的对象标识符(OID),并将每个值转换为指标。由于接收器没有内置指标集,你需要自行决定收集哪些 OID 以及如何命名它们。
本指南中的示例配置收集设备运行时间、各接口的流量、错误和链路状态。这些 OID 来自标准的 SNMPv2-MIB 和 IF-MIB,大多数网络设备都支持。
使用自建 SigNoz?大多数步骤相同。若需适配本指南,请参考云托管转自建的说明,更新端点并移除摄入密钥请求头。
前提条件
- 在各设备上启用 SNMP,并设置允许来自 Collector 主机 IP 地址查询的访问规则。
- 在设备上配置 SNMP 团体字符串(SNMPv2c)或用户凭据(SNMPv3)。
- OpenTelemetry Collector contrib 发行版(安装指南)。SigNoz Collector 也包含 SNMP 接收器。
- SigNoz 实例(云托管或自建)。
SNMP 轮询机制
接收器执行数据拉取:Collector 在每个 collection_interval 周期向设备发送请求。Collector 主机需要能够访问其轮询的所有设备。
如果设备位于当前 Collector 无法访问的网络段内,可在该网络段内部署第二个 Collector。该 Collector 负责轮询段内设备,并通过 OTLP 将指标转发至 SigNoz,这样只需一条出站连接穿越网络边界:
Copy设备 → 同网络段的 Collector → SigNoz (OTLP over HTTPS)确保开放以下端口/路径:
- Collector 主机到各设备的 UDP 161。
- Collector 主机到 SigNoz 云服务的 HTTPS 443,或到自建 SigNoz 的 4318 端口。
将 SNMP 指标发送至 SigNoz
步骤 1:检查设备是否响应
修改 Collector 配置前,先在 Collector 主机上执行查询,确认能连通该设备。本例使用 Net-SNMP 工具中的 snmpget 来读取设备名称:
snmpget -v2c -c <community-string> <device-ip> 1.3.6.1.2.1.1.5.0如果 shell 提示 snmpget: command not found,请安装 Net-SNMP 客户端工具:在 Debian 或 Ubuntu 上运行 sudo apt install snmp,在 RHEL 或 Fedora 上运行 sudo dnf install net-snmp-utils。
对于 SNMPv3,需传入用户名和凭据,而非 community string:
Copysnmpget -v3 -u <snmp-user> -l authPriv -a SHA -A <auth-password> -x AES -X <privacy-password> <device-ip> 1.3.6.1.2.1.1.5.0正常工作的设备会返回其名称:
CopySNMPv2-MIB::sysName.0 = STRING: fw-edge-01请核对以下值:
<community-string>:设备的 SNMPv2c 只读 community string。<device-ip>:设备的 IP 地址或主机名。<snmp-user>、<auth-password>和<privacy-password>:在设备上配置好的 SNMPv3 用户名及密码。
若命令输出 Timeout: No Response,请先解决访问问题再继续。参见 故障排查。
步骤 2:配置 snmp receiver
在现有 Collector 配置的 receivers 部分添加此 receiver,不要替换整个文件。该配置每 60 秒使用 SNMPv2c 轮询一次设备:
receivers:
  snmp:
    endpoint: udp://<device-ip>:161
    version: v2c
    community: ${env:SNMP_COMMUNITY}
    collection_interval: 60s

    resource_attributes:
      device.name:
        scalar_oid: "1.3.6.1.2.1.1.5.0" # SNMPv2-MIB::sysName

    attributes:
      interface.name:
        oid: "1.3.6.1.2.1.31.1.1.1.1" # IF-MIB::ifName
      direction:
        enum: [receive, transmit]

    metrics:
      snmp.system.uptime:
        description: 网络管理代理上次重启以来的运行时长。
        unit: cs
        gauge:
          value_type: int
        scalar_oids:
          - oid: "1.3.6.1.2.1.1.3.0" # SNMPv2-MIB::sysUpTime
            resource_attributes: [device.name]

      snmp.interface.io:
        description: 每个接口接收和发送的字节数。
        unit: By
        sum:
          aggregation: cumulative
          monotonic: true
          value_type: int
        column_oids:
          - oid: "1.3.6.1.2.1.31.1.1.1.6" # IF-MIB::ifHCInOctets
            resource_attributes: [device.name]
            attributes:
              - name: interface.name
              - name: direction
                value: receive
          - oid: "1.3.6.1.2.1.31.1.1.1.10" # IF-MIB::ifHCOutOctets
            resource_attributes: [device.name]
            attributes:
              - name: interface.name
              - name: direction
                value: transmit

      snmp.interface.errors:
        description: 因错误而无法接收或发送的数据包数量。
        unit: "{packet}"
        sum:
          aggregation: cumulative
          monotonic: true
          value_type: int
        column_oids:
          - oid: "1.3.6.1.2.1.2.2.1.14" # IF-MIB::ifInErrors
            resource_attributes: [device.name]
            attributes:
              - name: interface.name
              - name: direction
                value: receive
          - oid: "1.3.6.1.2.1.2.2.1.20" # IF-MIB::ifOutErrors
            resource_attributes: [device.name]
            attributes:
              - name: interface.name
              - name: direction
                value: transmit

      snmp.interface.oper_status:
        description: 每个接口的运行状态,1 表示正常,2 表示宕机。
        unit: "1"
        gauge:
          value_type: int
        column_oids:
          - oid: "1.3.6.1.2.1.2.2.1.8" # IF-MIB::ifOperStatus
            resource_attributes: [device.name]
            attributes:
              - name: interface.name
确认以下配置项:
<device-ip>:设备的 IP 地址或主机名。除非该设备的 SNMP agent 监听其他端口,否则请保持端口为161。SNMP_COMMUNITY:一个保存设备只读 community string 的环境变量。这是你在第 3 步中设置的。使用${env:SNMP_COMMUNITY}这种引用方式,可以避免将敏感信息直接写入配置文件中。
即使只监控单台设备,也请保留 device.name 资源属性。因为接收器(receiver)不会自动将设备地址附加到指标数据中,缺少 device.name 将导致你无法在 SigNoz 中区分不同设备。
如需轮询多台设备、使用 SNMPv3 或采集其他 OID,请参阅 自定义设置。
步骤 3:启用接收器并重启 Collector
安装指南已配置了将数据发送至 SigNoz 的 otlphttp 导出器(exporter)。只有当你的配置文件中没有 otlphttp 导出器时,才需要添加以下配置:
exporters:
  # On Collector v0.144.0 and newer, use "otlp_http" to avoid a deprecation warning.
  otlphttp:
    endpoint: https://ingest.<region>.signoz.cloud:443
    headers:
      signoz-ingestion-key: <your-ingestion-key>
确认以下配置项:
<region>:你的 SigNoz Cloud 区域。<your-ingestion-key>:你的 SigNoz 摄入密钥。
exporters:
  # On Collector v0.144.0 and newer, use "otlp_http" to avoid a deprecation warning.
  otlphttp:
    endpoint: http://<signoz-instance>:4318
确认以下配置项:
<signoz-instance>:托管 SigNoz 的机器的 IP 地址或域名。
在 processors 部分添加一个 resource 处理器。它会设置服务名称,从而为每一项 SNMP 指标提供一个统一的过滤器:
processors:
  resource/snmp:
    attributes:
      - key: service.name
        value: <service-name>
        action: upsert
确认以下配置项:
<service-name>:用于在 SigNoz 中识别你的 SNMP 设备的名称,例如snmp-devices。
在 service.pipelines 下添加专用的 metrics/snmp 管道:
service:
  pipelines:
    metrics/snmp:
      receivers: [snmp]
      processors: [resource/snmp, batch]
      exporters: [otlphttp]
这些列表中的名称必须与你声明的键名保持一致。如果你将 exporter 重命名为 otlp_http,此处也需使用该名。
专用管道省略了 resourcedetection 处理器。该处理器会为每个指标打上 Collector 主机 host.name 标签,这会导致防火墙指标被标记为错误的主机。
设置 community string 并重启 Collector。如果是按照虚拟机指南通过 systemd 安装的,请打开 Collector 的环境配置文件:
Copysudoedit /etc/otelcol-contrib/otelcol-contrib.conf添加以下行,将 <community-string> 替换为设备的只读 community string,然后重启服务:
SNMP_COMMUNITY=<community-string>sudo systemctl restart otelcol-contrib在 Docker 或 Kubernetes 环境中,请改为将 SNMP_COMMUNITY 设置为 Collector 容器的环境变量。
验证
- 在 Metrics Explorer 中搜索
snmp.interface.io。 - 按
device.name过滤,将时间聚合设置为 Rate,并按interface.name和direction分组。每个接口将显示为接收和发送两个系列,单位为每秒字节数。
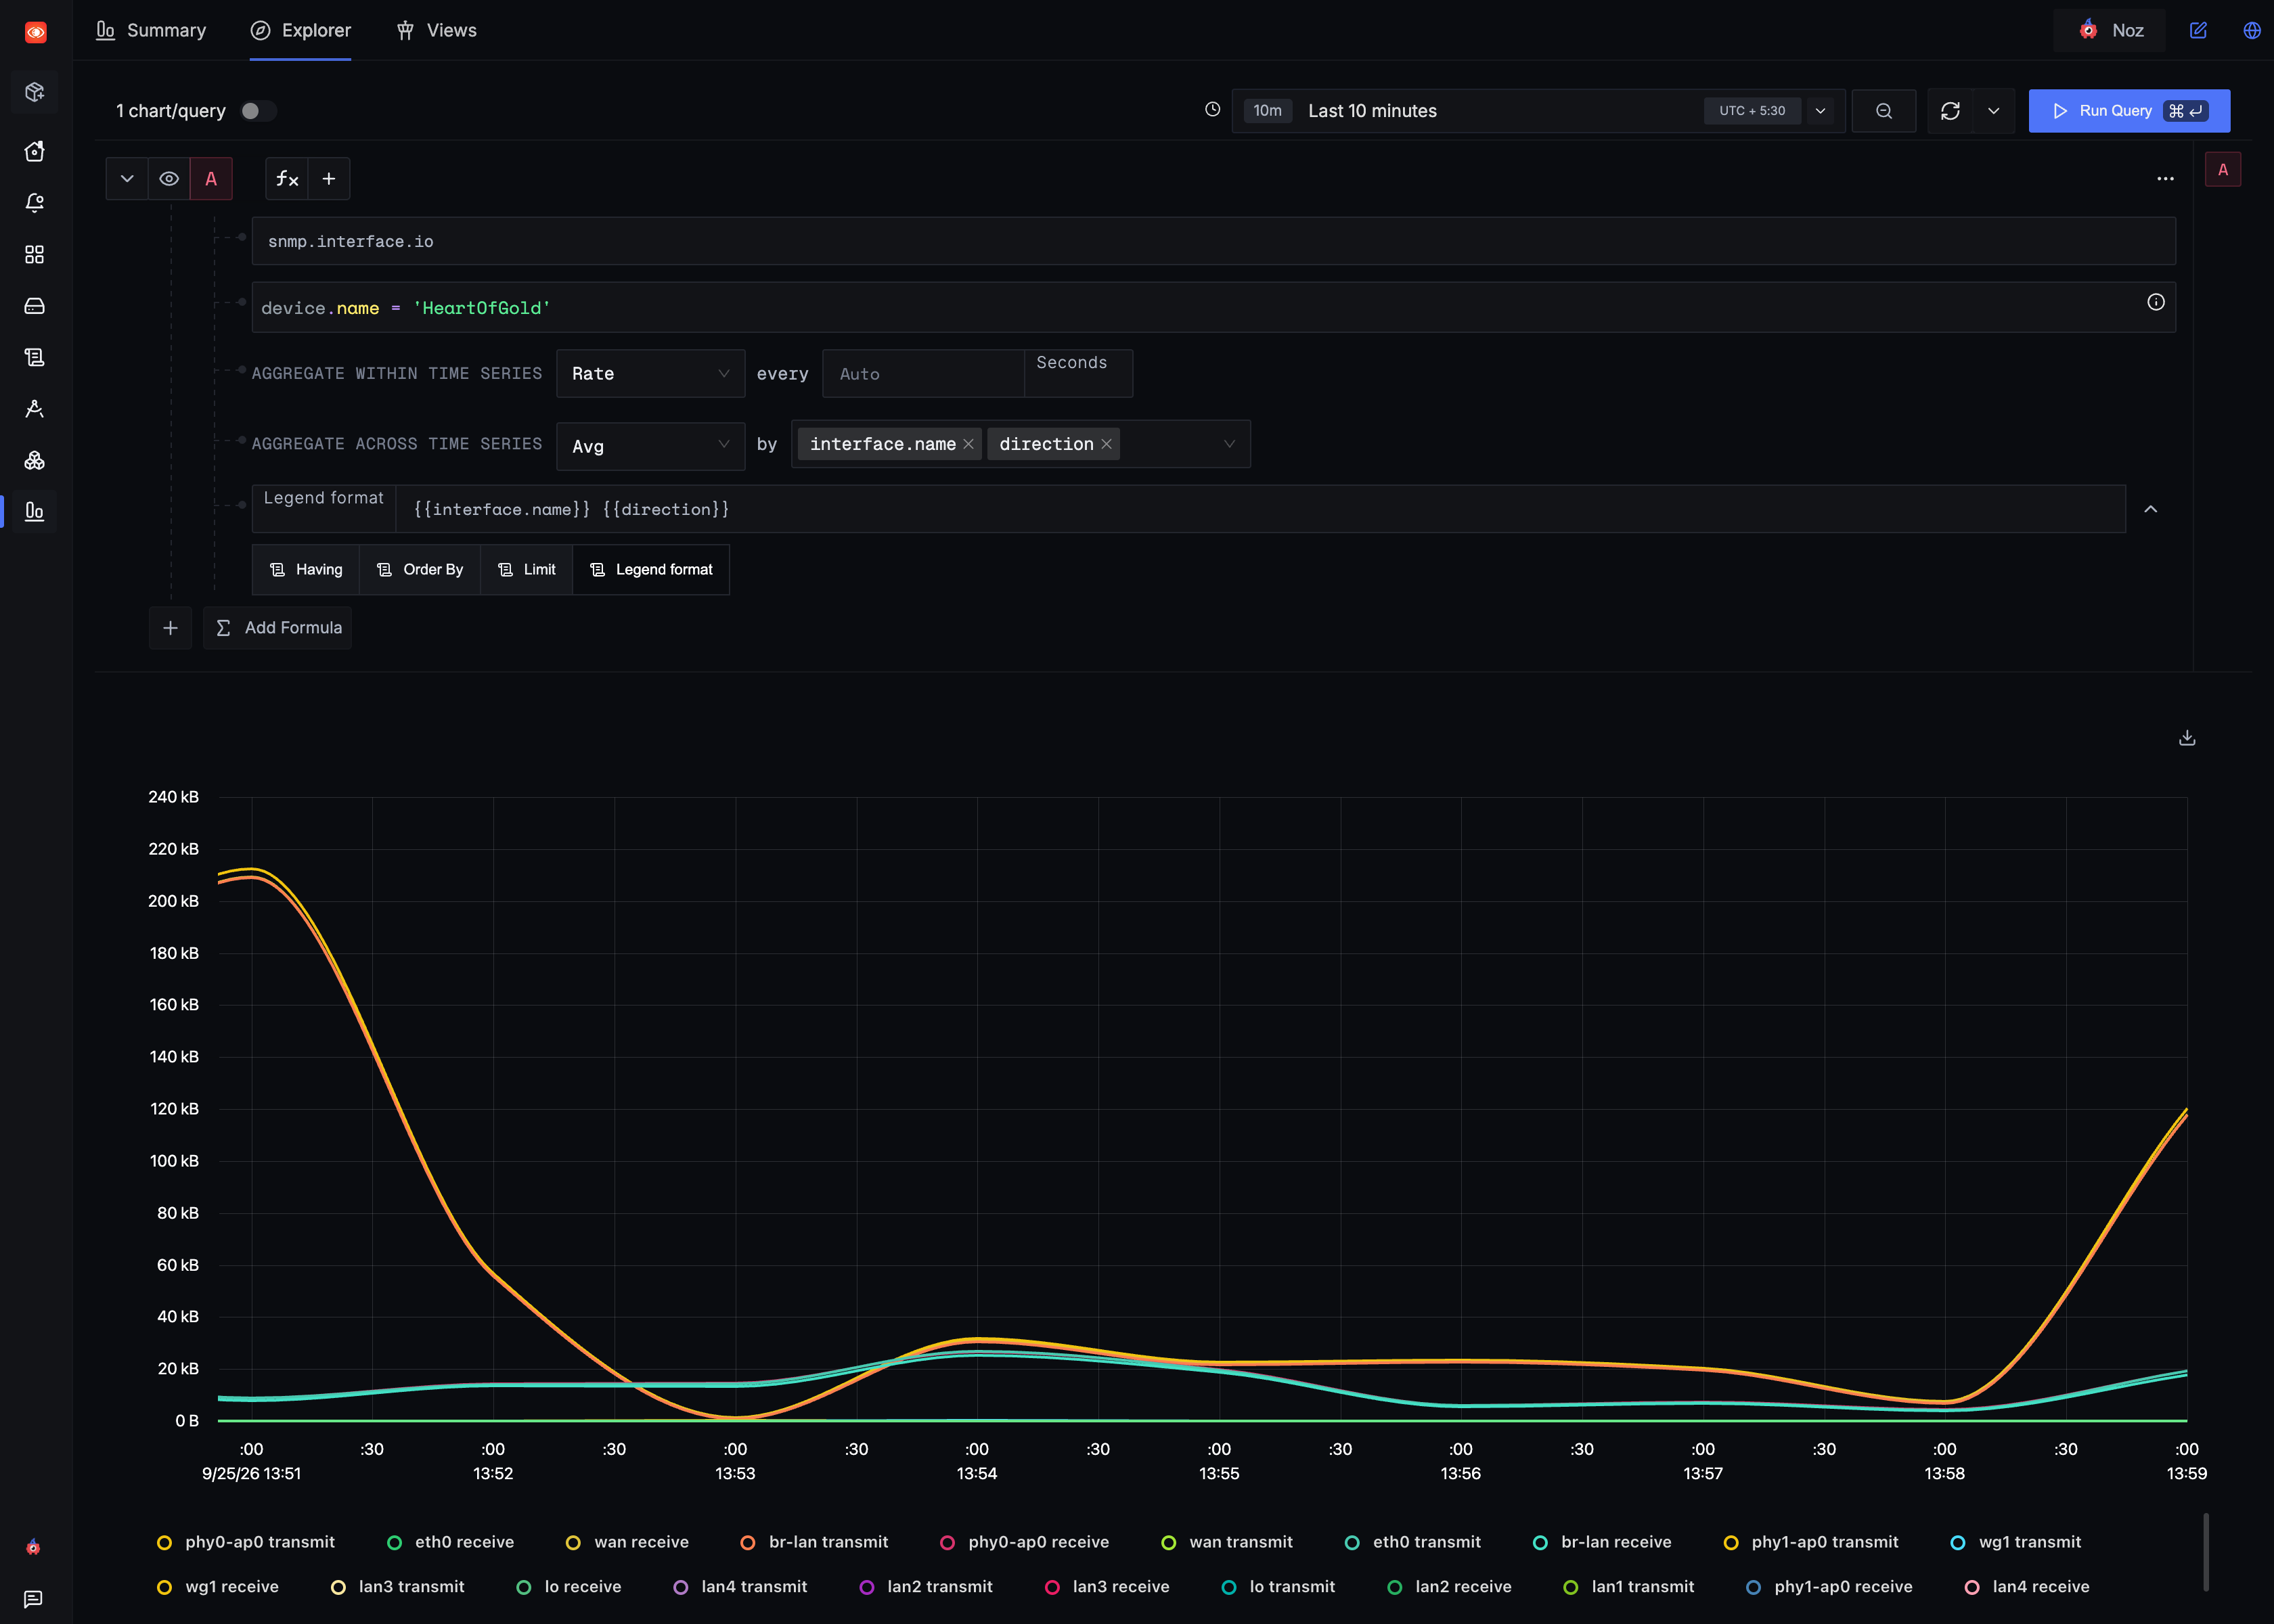
收集的指标
| 指标 | 类型 | 单位 | 属性 |
|---|---|---|---|
snmp.system.uptime | gauge | cs | 无 |
snmp.interface.io | sum | By | interface.name、direction |
snmp.interface.errors | sum | {packet} | interface.name、direction |
snmp.interface.oper |